Installing and Configuring Agents
This section describes the installation of Foglight for PostgreSQL. Follow the steps in the order mentioned below:
Configuring the PostgreSQL Server
To enable full monitoring of the PostgreSQL Server, the agent requires a user with sufficient privileges to execute system queries. Additionally, several server features must be enabled in the server configuration file—typically the postgresql.conf file in a native instance or the configuration UI in a hosted instance such as AWS Aurora or RDS.
PostgreSQL Agent User Permissions
The PostgreSQL agent requires a database user with minimum required privileges to fully monitor the database.
Create a new user using an existing user with the appropriate permissions or a utility program of your choice. Ensure that the new user has access to all databases you want to monitor. Additionally, configure any firewalls and update the pg_hba.conf file to allow the new user to connect from the FglAM host where the agent is running.
The agent only queries system tables and views and uses a few system functions to collect operational data.
User privileges required for the PostgreSQL agent for versions 10 and above:
- PG_MONITOR
- PG_READ_ALL_SETTINGS
- PG_READ_ALL_STATS
- PG_STAT_SCAN_TABLES
For versions below 10:
- LOGIN
- CONNECT (on all databases)
- SELECT (on all databases)
The agent requires a SUPERUSER or relevant privilege to execute various administration functions and request certain EXPLAIN plans through the Foglight console, if enabled. You can provide the agent with a separate user to perform these functions exclusively.
For Example,
CREATE USER user1 WITH PASSWORD ‘password1’ LOGIN SUPERUSER;
Only Foglight users with the “PostgreSQL Administrator” role can access these functions.
Workload and I/O Metrics
The track_io_timing property must be set to “ON”. For more information, refer to the PostgreSQL Documentation🔗.
Statement Monitoring
To enable statement tracking, you must install the pg_stat_statements module and create the extension in a database. Follow the steps below to complete the installation.
For detailed instructions, refer to the PostgreSQL documentation specific to your version.
- In the configuration file, set the following sample properties. The pg_stat_statements module supports advanced configuration options, but these are the minimum required settings:
- shared_preload_libraries = ‘pg_stat_statements’
- pg_stat_statements.max = 1000
- pg_stat_statements.track = all For more information about properties refer to the PostgreSQL Documentation🔗.
- Restart the server.
- In PSQL, pgAdmin, or another client program, connect to any database (such as postgres) and execute the following statement: “CREATE EXTENSION pg_stat_statements;"
The pg_stat_statements view appears in the public schema of the database. If the public schema does not exist, create it first. - When configuring the Foglight for PostgreSQL agent properties, enable statement tracking and specify the database name where you created the extension.
Using Performance Investigator (PI) is an alternative to legacy statement monitoring. For more information refer to Configuring PostgreSQL Performance Investigator (PI)
Configuring an Encrypted Connection
This section covers the common steps used to configure an encrypted connection from the PostgreSQL Agent client. For more information on secure connections and server-side configuration, refer to the 18.9 Secure TCP/IP Connections with SSL🔗 section of the PostgreSQL documentation for your version.
To enable SSL, set the ssl parameter in the postgresql.conf file on the PostgreSQL server. Ensure that the server certificate and private key exist in the default data directory or a directory specified in the configuration.
If the client must provide a trusted certificate, include the root CAs on the server. Additionally, update the pg_hba.conf file to require the connecting user to supply a certificate.
For more information on client-side SSL configuration, refer to the Using SSL🔗 section of the PostgreSQL JDBC Driver documentation. The agent can use two methods to access certificates, covered in the following sections. When finished, restart the FglAM and continue with the agent configuration.
Using the Filesystem
The first is to access them on the filesystem of the FglAM host. File paths are provided to the agent through the file path agent properties as mentioned in the Setting SSL Connection Parameters section.
If using an SSL Key file, it must be converted to PKCS8 format with the following command:
openssl pkcs8 -topk8 -inform PEM -outform DER -in postgresql.key -out postgresql.pk8 -nocrypt
The “-nocrypt” argument can be dropped to leave the key encrypted, however a password must be created during encryption and provided in the agent properties.
Using the Java Truststore
The other method requires the certificates to be imported into the Java truststore. The server certificate will first need to be converted into a different format, using the following command:
openssl x509 -outform DER -in server.crt -out server.crt.der
Then, it must be imported into the FglAM truststore. You can use the bundled keytool, which will be located in the Foglight Agent Manager\jre\1.8.0.72\jre\bin directory, or the equivalent on your system, with these commands:
keytool.exe -import -file server.crt.der -keystore truststore -alias postgresql
If you have not changed the password for the keystore, the default password will be “changeit”. Then edit the baseline.jvmargs.config file in the Foglight Agent Manager\state\default\config directory and add the following parameters with file paths and passwords appropriate for your system. Escape any quotes with a ‘\’.
vmparameter.0 = “-Djavax.net.ssl.trustStore=\“C:/Program Files/Common Files/Quest/Foglight Agent Manager/jre/1.8.0.72/jre/bin/truststore\””;
vmparameter.1 = “-Djavax.net.ssl.trustStorePassword=changeit”;
Creating and Configuring Agents
Agents can be created in one of two ways:
The Agent Installer Wizard simplifies the agent creation and configuration process and can be accessed from the Databases dashboard. For advanced configuration or modification of agent properties post-creation, use the Agent Status dashboard.
Using the Agent Installer Wizard
Foglight for PostgreSQL offers a graphical, intuitive interface for creating and configuring agents. This method serves as an alternative to Foglight’s default approach, which involves creating agents and editing their properties through the Agent Status dashboard.
With Foglight for PostgreSQL, you can use a wizard that provides a unified entry point for adding database instances and configuring them for monitoring.
To run the instance installation wizard:
- On the Welcome page, click Monitor Databases or click Databases in the navigation pane. On a fresh installation, no instances are listed for PostgreSQL in the Databases dashboard.
- On the Databases dashboard, click Monitor and select PostgreSQL. The Agent Installer wizard opens.
- In the Agent Name field, enter the name of the agent to be created. This represents the database instance that the agent monitors.
- In the Agent Manager field, select the agent manager on which the agent should run.Considerations for this may include physical or virtual locality to the monitored instance, allocated resources, or grouping with other agents of the same type or monitored environment.If the agent package has not yet been deployed to this Agent Manager, the system will install it when you create the first agent of this type.
- Click Next.
- Enter the connection parameters to connect and monitor the database instance. For detailed information about these properties, refer to Agent Properties.
- Click Next.
- The Agent Summary displays the details about the agent properties. Click Finish.
The database instance gets created and appears in the list of all instances.
If the agent gets created successfully but the data does not appear, then navigate to Administration > Agents > Agent Status and click the icon in the Log File column for the agent you created. In most cases, the reason for the failure will be obvious. You can also refer to the Foglight for PostgreSQL Installation and Troubleshooting document for common errors and solutions. If the solution requires reconfiguring the agent properties, follow steps 7-11 of the Using the Agent Status Dashboard section.
Using the Agent Status Dashboard
The Agent Status page can be used to create new agents and configure and manage existing agents. To access the page from the navigation pane, click Administration > Agents > Agent Status.
To create a new agent instance:
Deploy the PostgreSQL agent package to the FglAM before creating the agent if it has not been deployed yet. Click Deploy Agent Package on the Agent Status or Agent Managers page to perform this.
- Navigate to Administration > Agents > Agent Status.
- Click Create Agent.
- Select the hosts to which you want to deploy agent packages.Considerations for this may include physical or virtual locality to the monitored instance, allocated resources, or grouping with other agents of the same type or monitored environment.
- Click Next.
- Select the PostgreSQLAgent type. Then, select the Specify Name radio button and enter agent instance name. Click Next.
- Click Finish.
- Once the agent has been created, click the checkbox next to the PostgreSQL agent.
- Click Edit Properties.
- Select Modify the default properties for this agent.
- Edit the agent properties for the PostgreSQL agent instance:
- Click the Activate button.
To modify the properties of an existing agent, follow steps 7-11.
Configuring Agent Properties
This is a full list and explanation of the configurable properties of the Foglight for PostgreSQL agent. The Agent Installer Wizard provides access to the essential subset of available properties. To modify other properties or modify the agent configuration after creation, use the Agent Status dashboard.
This section includes the following key areas:
- Setting Connection Parameters (mandatory)
- Setting SSL Connection Parameters (optional)
- Setting Administration Options (optional)
- Setting Collection Intervals (optional)
- Top Tables Collection (optional)
- Tables Report (optional)
- Statement Tracking (optional)
- Setting DB Overrides (optional)
- Setting Options (optional)
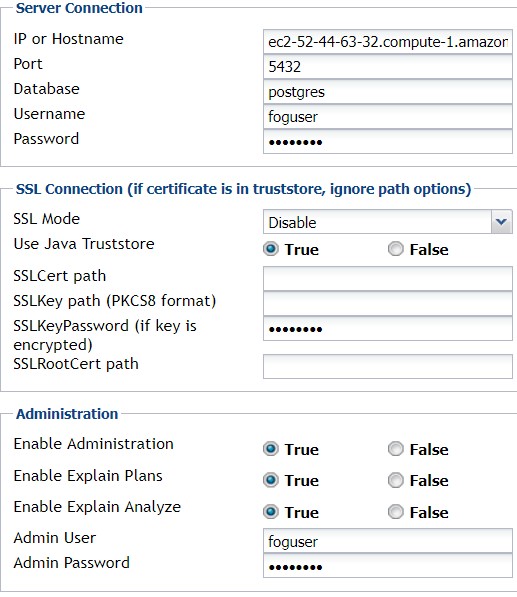
Setting Connection Parameters (mandatory)
- Database Host or IP- Host where PostgreSQL database server is running. Enter a hostname or IP address. Default value is localhost.
- Database Port - The port on which the PostgreSQL database is running. Default is 5432.
- Database Name - The name of a PostgreSQL database that the user is permitted to connect to. This is used for connection purposes only; all non-system databases will still be monitored.
- Database User - The user that can connect to the PostgreSQL database server being monitored.
- Database Password - User password that can connect to the PostgreSQL database being monitored.
Setting SSL Connection Parameters (optional)
- SSL Mode – Sets SSL mode for JDBC connection and verification level for connection. For more information on mode levels, refer to Configuring the Client🔗 section of the PostgreSQL JDBC documentation. If you are not using an SSL connection, set to disabled and ignore the rest of this section.
- Use Java Truststore – If set to true, the agent will look for the SSL certificates in the Java truststore. The certificates will need to be imported into the truststore first. For more information refer to Using the Java Truststore. To access the certificates from the filesystem, set to false and use the fields below:
- SSLCert path – The full path of the certificate file.
- SSLKey path – The full path of the key file.
- SSLKeyPassword – Enter the password if the key file is encrypted.
- SSLRootCert path – The full path of the SSL root certificate.
Setting Administration Options (optional)
The Administration options allow you to perform certain server operations on the monitored server directly from Foglight. These operations are restricted to Foglight users with the PostgreSQL Administrator role.
- Enable Administration – Allows server operations to be performed from Foglight.
- Enable Explain Plans – Enables on-demand EXPLAIN plan requests through Foglight without requiring Administration to be enabled.
- Enable Explain Analyze – When enabled, the Analyze option in the Explain Plan request form becomes selectable. The EXPLAIN ANALYZE command executes the query on the server and returns actual run times and other statistics. Administrators should use this option with caution.
- Admin User – A user with the SUPERUSER privilege who can perform enabled administrative operations. The system uses this user only for administrative tasks, not for normal data collection.
- Admin Password – Password for the admin user.
Setting Collection Intervals (optional)
The Collection Interval list in the agent properties is used to set the sample frequencies (in seconds) for the various collections performed by the agent. Default settings are provided in the DefaultIntervals list installed with the cartridge, but can be copied and modified by the user. Collections can be disabled by setting the interval to 0.
- DB List Refresh – Scans the server for databases to schedule collections. Since databases are rarely added or removed, this process does not need to run frequently. The default interval is 1800 seconds.
- Availability – Performs a basic heartbeat check to verify whether the server is running and measures the connection time. This check should run frequently. The default interval is 60 seconds.
- Server and DBs – Collects server metrics, configuration data, and database-level statistics. The default interval is 300 seconds.
- Tables, Indexes, & Functions – Gathers table, index, and function statistics from each database. The default interval is 300 seconds.
- Configuration – Collects server configuration details. The default interval is 3600 seconds.
Top Tables Collection (optional)
The Table Collection section is used to configure collection of the top tables on the server.
- Enable Top Tables Collection – Enables the Top Tables collection. You can disable this feature for specific databases in the DB Overrides section. This setting is enabled (true) by default.
- # of Top Tables (per DB) – Defines the number of tables collected per database. Once a table is collected, it remains in the collection—even if it no longer meets the criteria—until the agent is restarted. You can modify this setting for individual databases in the DB Overrides section.
- Sort By – Specifies the parameter used to determine which tables to include in the collection. For example, if set to Total Table Size and # of Top Tables is 100, the agent collects the 100 largest tables from each database. The default setting is Scans (Count).
Tables Report (optional)

The Tables Report section configures a limited collection of tables based on one or more specified parameters. Tables collected through this method are not created as persistent topology objects and only appear in the PostgreSQL Full Tables Report.
- Enable Table Reporting – Enables the Table Report collection. You can disable this feature for specific databases in the DB Overrides section. This setting is disabled (false) by default.
- Reporting Interval (hrs) – Defines how often the system collects information for the PostgreSQL Full Tables Report. The default interval is 12 hours.
- Required Parameters – Specifies whether collected tables must meet all or any of the parameters defined in the Report Parameters setting. The default value is All.
- Report Parameters – Defines the parameters for table collection. In the Parameter column, select one of the available options. The system evaluates each table’s value against the comparator and value column settings. If the condition evaluates to true, the table is included in the report, based on whether it meets any or all of the specified parameters.
For example, if Table Size (Tuples) ≥ 80 is set, the system includes all tables with at least 80 live tuples in the report.
Statement Tracking (optional)
If the pg_stat_statements module and extension are enabled on the PostgreSQL server, you can use this section to configure statement statistics tracking.
- Enable Statement Tracking – Enables or disables statement tracking.
- DB w/ pg_stat_statements View – Although statement tracking occurs across all databases, the pg_stat_statements extension is only available in databases where it has been created. If multiple databases contain the pg_stat_statements view, enter the name of any one of them in this field.
- # of Top Statements – Defines the number of statements the agent collects. To collect all statements, enter the value of pg_stat_statements.max or a higher number.
- Statement Text Length – Truncates the collected statement text to the specified character limit.
- Sort By – Determines how statements are sorted before selecting the # of top statements specified. If collecting all statements, this setting is not relevant. Otherwise, various sorting options are available based on existing or calculated column data in the view.
Setting DB Overrides (optional)
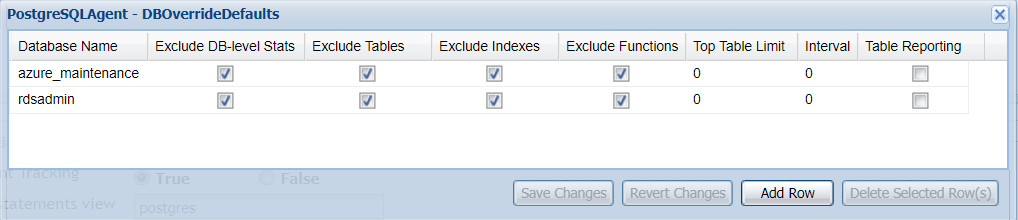
The DB override properties provide granular control over database collections. If a database is not specified in this section, it will use the parameters defined in the Collection Intervals section.
- Database Name – Specifies the name of the database where collections are overridden.
- Exclude DB-level Stats – When set to true, the agent does not collect database-wide statistics aggregated from objects within the database.
- Exclude Tables – When set to true, the agent does not collect statistics for individual tables in the database.
- Exclude Indexes – When set to true, the agent does not collect statistics for individual indexes in the database.
- Exclude Functions – When set to true, the agent does not collect statistics for individual functions in the database.
- Top Table Limit – Overrides the number of tables collected in the Top Tables collection for this database.
- Interval – Overrides the default Tables, Indexes, and Functions collection interval set in the Collection Intervals section for this database.
- Table Reporting – Overrides the Enable Table Reporting setting. If set to true, the Table Report collection is enabled for this database. If set to false, it remains disabled.
Setting Options (optional)
- Enable Dynamic Memory Allocation – Enables dynamic memory allocation, allowing the agent to request additional memory from the FglAM based on the expected data volume. Use this setting only if recommended by Quest Support. The default setting is false.
- Agent Host Name – Defines the hostname property for the PostgreSQL server topology object. By default, this property is set to the connection parameter value specified above. However, you can override it using this setting. If you are also monitoring the OS, ensure that the PostgreSQL agent and OS agent report the same hostname so they can be linked correctly.