Configuring Connectors
Integration Hub connectors establish secure connections between Foglight and external systems like ServiceNow and Jira. This enables automatic ticket creation when Foglight generates alarms, streamlining your incident response workflow.
This section covers the following key areas:
To set up these connections, you must provide authentication credentials, specify target locations for ticket creation, and test the connection to ensure proper functionality.
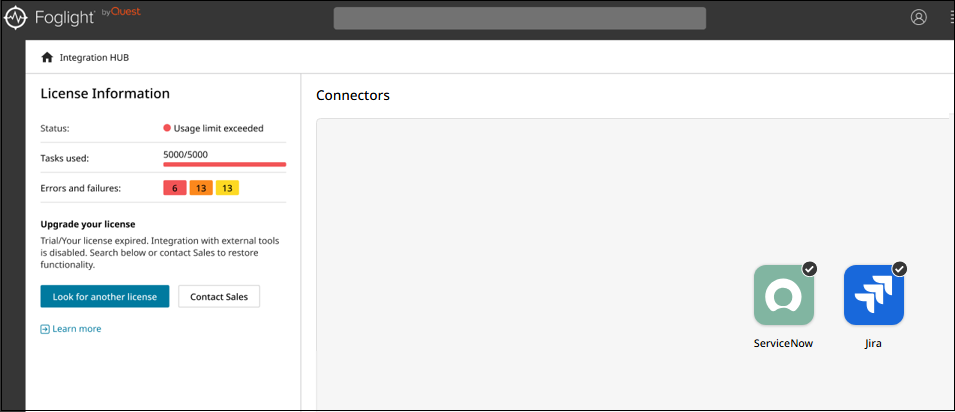
Each connector displays a checkmark that indicates successful connection.
Configuring ServiceNow
To connect Integration Hub to ServiceNow:
In the right pane, click the ServiceNow connector. The ServiceNow Configurations window appears.
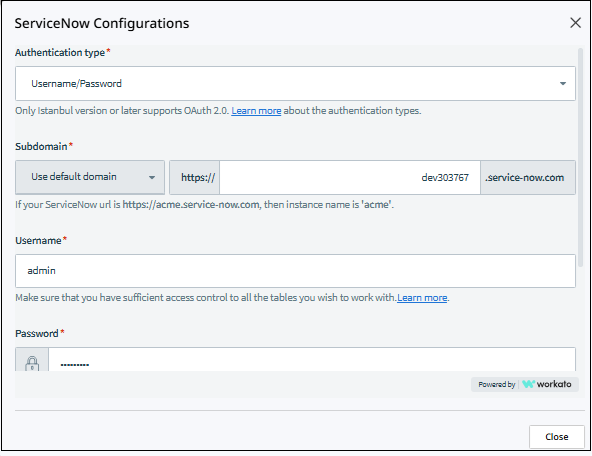
Configure the following connection settings:
- Authentication type: Select Username/Password from the dropdown (OAuth 2.0 is also available for supported ServiceNow versions)
- Subdomain: Select Use default domain or enter your custom subdomain. The system automatically constructs the URL as https://[subdomain].service-now.com.
- Username: Enter a ServiceNow username that has access to create and update Incidents and Business Rules (for example, the
itilandpersonalize_rulesroles). - Password: Provide your ServiceNow password
Click Connect to verify the connection.
When the connection is successful, a green checkmark appears on the ServiceNow connector icon. If the connection fails, an error message displays with details about the connection issue.
To ensure the Reverse Sync integration activates successfully, verify that the ServiceNow service account has at least the following roles:
- itil: required to create and update Incidents.
- personalize_rules: required to create and update Business Rules.
If the personalize_rules role is missing, the Reverse Sync integration fails to activate.
Configuring Jira
To connect Integration Hub to Jira:
In the right pane, click the Jira connector. The Jira Configurations window appears.
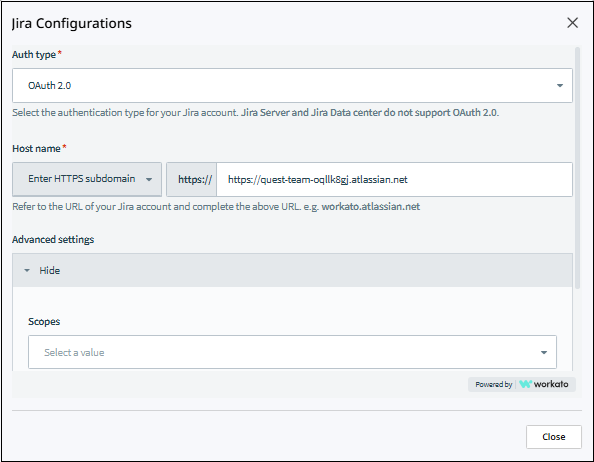
Configure the following connection settings:
- Auth type: Select OAuth 2.0 from the dropdown (note that Jira Server and Jira Data Center do not support OAuth 2.0)
- Host name: Choose “Enter HTTPS subdomain” or enter your custom host. The system displays the complete URL format (for example, https://janurea.atlassian.net)
- Advanced settings: Click to expand additional configuration options
- Scopes: Select from available scope values to define access permissions
Complete the authentication process as prompted.
Click Connect to verify the connection.
When the connection is successful, a green checkmark appears on the Jira connector icon. If the connection fails, an error message displays with details about the connection issue.

