Working with Integration Hub
Integration Hub allows you to connect Foglight with other systems you rely on, such as ServiceNow, Jira, and more. Once enabled, alerts stay synchronized across platforms, providing a seamless and reliable experience.
The use of Integration Hub is optional and requires an additional license. For Foglight Cloud deployments, a Foglight owner can enable a trial license with 5,000 tasks to test this feature.
This section covers the following topics:
- Benefits
- Using Integrations Hub
- Create notification channels
- Associate with alarm templates
- Basic troubleshooting
Benefits
When Foglight generates an alarm that matches your configured criteria, Integration Hub automatically creates a corresponding ticket or issue in your connected system, helping you maintain faster incident response times.
Integration Hub provides the following benefits:
- Streamlined workflows: Integrates monitoring alerts directly into your existing ITSM and project management processes
- Reduced response time: Ensures performance issues are immediately tracked in your business systems
- Centralized management: Provides a single interface to configure and monitor all your integrations
Using Integrations Hub
The Integration Hub interface provides a centralized dashboard where you can manage connectors, monitor license usage, and troubleshoot integration issues.
To access Integration Hub:
Log in to Foglight.
Navigate to Administration > Integration > Integration Hub. The Welcome to Integration Hub screen appears.
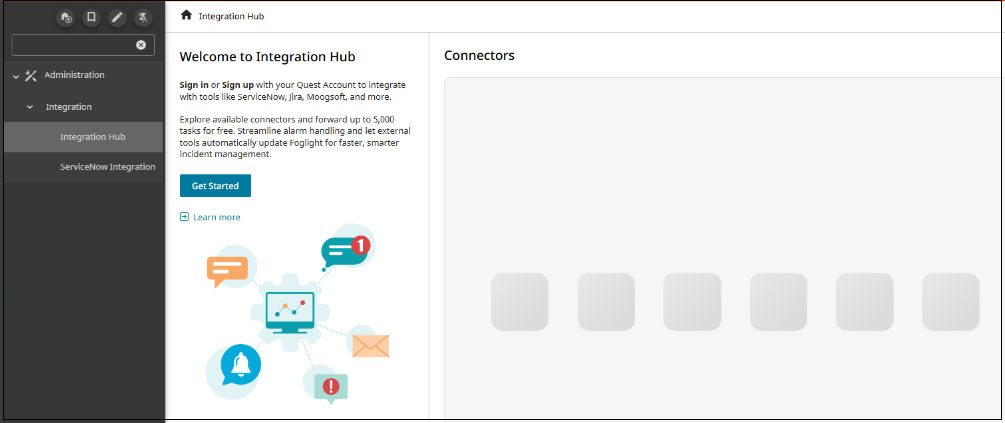
Select Get started. This obtains a Foglight Integrations Subscription license from the Quest license portal.
The Foglight Integrations Subscription license is obtained if you have a Quest account. If you do not have a Quest account, create one during this step.
The system automatically provides a trial license with 5,000 tasks. This trial allocation allows you to evaluate Integration Hub functionality before you commit to a full subscription. The trial provides sufficient capacity to test integration workflows and assess task consumption patterns for your environment.
Tasks represent units of communication effort between Foglight and external systems. Once configured, when Foglight generates an alarm that matches your settings, Integration Hub automatically creates a ticket in ServiceNow or an issue in Jira. Each alarm that is processed consumes tasks from your license allocation. Additional tasks are consumed when updating existing item status or performing synchronization operations. Monitor your task consumption to ensure you stay within license limits and optimize notification channel configurations to balance integration functionality with available task allocation.
The below table shows the amount of tasks being used per connector and action:
Platform Action Case Tasks Jira Forward Alarm Events and Add Alarm Note Alarm Fire 3 Jira Forward Alarm Events and Add Alarm Note Alarm Clears 1 Jira Forward Alarm Events and Add Alarm Note Error 3* Jira Reverse Alarm Sync Successful Match 2 Jira Reverse Alarm Sync Error 3* ServiceNow Forward Alarm Events and Add Alarm Note Alarm Fire 3 ServiceNow Forward Alarm Events and Add Alarm Note Alarm Clears 2 ServiceNow Forward Alarm Events and Add Alarm Note Error 4* ServiceNow Reverse Alarm Sync Successful Match 2 ServiceNow Reverse Alarm Sync Error 3* PagerDuty Forward Alarm Events and Add Alarm Note Alarm Fire 3 PagerDuty Forward Alarm Events and Add Alarm Note Alarm Clears 1 PagerDuty Forward Alarm Events and Add Alarm Note Error 3* PagerDuty Reverse Alarm Sync Successful Match 2 PagerDuty Reverse Alarm Sync Error 2* The task usage on Error has an asterisk (*) because the total number of tasks will depend on where the failure occurs. The number shown is the minimum and can be up to 3 times higher due to retries.
After the system obtains the license, a list of available connectors appears for your integration requirements.
If you require integration with systems not currently supported, contact your sales account manager to discuss custom connector options.
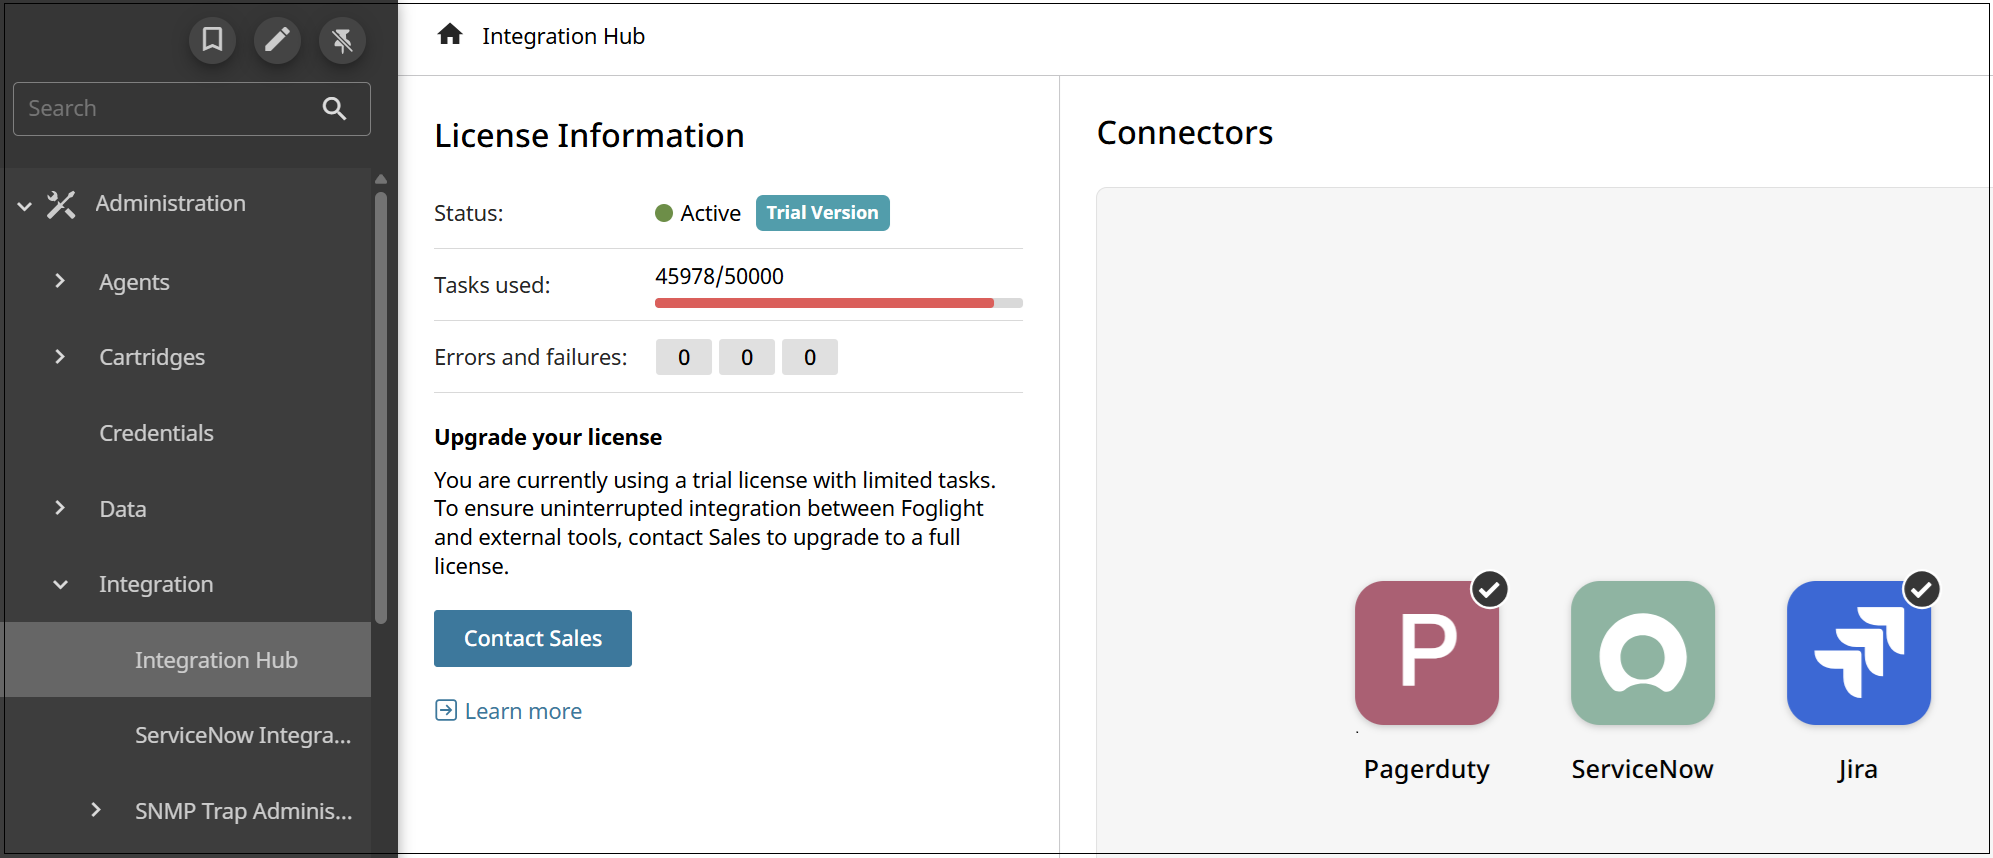
The left pane displays:
License status: Displays one of several possible states including Active, Trial, Expired, Usage limit exceeded, or License Required. Integration Hub displays different license states based on your current subscription status and usage patterns:
Active (Trial Version): Your trial license is active with full functionality available. Trial licenses provide 5,000 tasks to evaluate Integration Hub features. Monitor your task consumption to plan for license conversion before reaching the trial limit.
Active (Full License): Your subscription license is active with full functionality. The interface displays the expiration date to help you plan for renewal. Monitor both task usage and expiration dates to ensure uninterrupted service.
Usage Limit Exceeded: When you reach your task allocation limit (5000/5000 tasks used), new integration tasks are blocked to prevent overage charges. Your existing notification channels remain configured and functional, but no new tickets or issues will be created until you obtain additional license capacity.
License Expired: When your trial or subscription license expires, Integration Hub stops processing new integration requests. However, all previously configured notification channels and connector configurations are preserved in the system.
License Recovery: To restore full functionality when usage limits are exceeded or licenses expire:
a. Click Look for another license to search for available license allocations
b. If no additional licenses are found, contact Sales for license expansion or renewal
c. After obtaining a new license, you may need to reconfigure your connectors to re-establish authentication and connectivity
d. All existing notification channel configurations will continue to work once the license issue is resolved
Your notification channel configurations and alarm template associations are preserved during all license transitions, minimizing reconfiguration efforts when licenses are renewed, expanded, or converted from trial to full subscription.
Task usage: Shows how many integration tasks you have consumed against your total licensed allocation, helping you monitor usage patterns and plan for capacity requirements
Errors and failures: Provides a summary count of integration issues, and selecting this section displays a filtered query showing all alarms related to integration problems for detailed troubleshooting
Contact support: Click to expand your task capacity or upgrade from a trial license, contact Sales to upgrade to a full license.
The right pane displays the available connectors for Integration Hub.
To configure connections you need to set up authentication credentials, specify connection details, and test connectivity to ensure proper integration functionality.
For detailed step-by-step instructions on configuring each connector type, refer to Configuring Connectors
Create notification channels
After connecting to ServiceNow or Jira, create notification channels to route specific alarms to your external systems.
To create a notification channel:
Navigate to Alarm Management > Notification Management.
Click Add notification channel.

On the Define Details screen, click the Type dropdown and select your configured connector (ServiceNow or Jira). Also add the channel name.
Only connected connectors appear in this dropdown. If your connector type is not visible, verify that the connector is properly configured in Integration Hub.
Click Next.
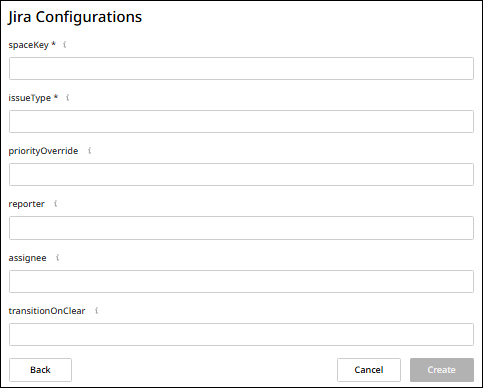
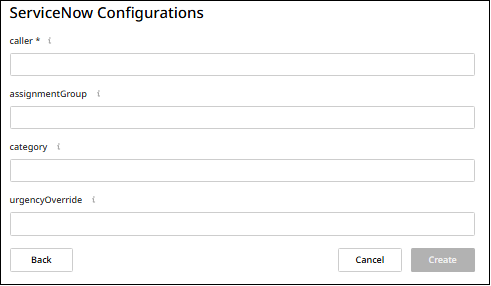
On the Settings screen, configure the specific parameters for ticket or issue creation in your external system. Each notification channel type (Jira or ServiceNow) provides specific configuration fields to enable effective integration with your external systems.
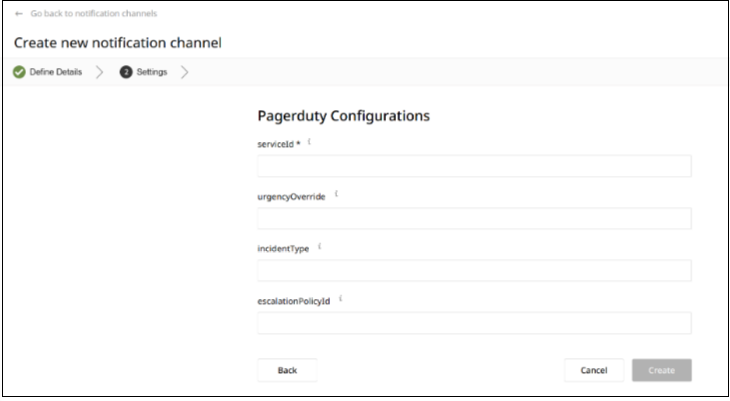
Complete the required fields as shown in the interface. Following are the configuration screens for each connector type.Mandatory fields are marked with an asterisk (*).
Jira Configuration:
ServiceNow Configuration:
PagerDuty Configuration:
If you do not specify values for Priority Override (Jira) or Urgency Override (ServiceNow), alarm severity in the external system matches the original Foglight alarm severity. When you configure override values, all alarms use the specified priority or urgency level regardless of their Foglight severity.
Click Create to save the notification channel.
Associate with alarm templates
Alarm templates in Foglight define the rules and conditions that determine when alarms are generated for monitored resources. These templates contain threshold configurations, severity levels, and notification settings that control how Foglight responds to performance issues across your infrastructure. For detailed information about creating and managing alarm templates, see Working with Templates.
To complete your integration setup, associate your notification channel with alarm templates:
Navigate to Alarm Management > Alarm Templates.
Select the alarm template you want to configure for integration.
Click on the appropriate domain tab (Database, Infrastructure, etc.).
Click Assign notification channel.
Select your Integration Hub notification channel from the dropdown.
Select which alarm severities should trigger notifications:

- Fatal: System failures and critical outages
- Critical: Performance degradation requiring immediate attention
- Warning: Threshold breaches and potential issues
- Information: Status updates and non-critical events
Start with Fatal and Critical alarms for initial testing to evaluate task consumption patterns.
Click Save to activate the integration.
Once configured, when Foglight generates an alarm that matches your settings, Integration Hub automatically creates a ticket in ServiceNow or an issue in Jira. Each processed alarm consumes one task from your license allocation.
If you cannot see a specific connector type in the dropdown when creating notification channels, verify that the connector is properly configured and connected in Integration Hub.
Basic troubleshooting
If integrations are not working as expected:
- Check connector status: Verify your ServiceNow or Jira connector shows a green checkmark in Integration Hub
- Verify notification channel assignment: Confirm your notification channel is assigned to the appropriate alarm template
- Check alarm filtering: Ensure alarms match the severity levels configured in your notification channel
- Test connection: Use the Test Connection button in Integration Hub to verify connectivity
For additional assistance, contact Quest Support.